Ad-Lib vs Trickle Feeding - What's Best For Your Horse?
Equestrian Advice & Guides Beginners Advice
Build your business profile for FREE and expose your services to thousands of potential clients!
Create my profile now!
Many, many years ago, I worked briefly in the racing industry. Very briefly, it wasn’t the place for me. But, a couple of valuable lessons came up. One of which, was overhearing a young apprentice jockey talking (excitedly) about how his position was “almost hitting the martini glass…” which was a little intriguing! And, it began part of my interest in position and the influence it has over a horse.
 Think of a martini glass. It has a base, a long, tall stem, and an almost V-shaped top. Jockey position? Yes!

Now, think of a jockey, and his martini glass comment…
Do you see the glass? Jockeys know the importance of being in balance – if you aren’t in balance, how do you ride a good finish?
His foot becomes the red line as the base, calf/shin is the yellow, and thigh, back and upper arm, the triangle on top.
So, what has all of this got to do with show jumping? We need to find a jumper version of the martini glass, since we don’t want to ride this short.
Now, think of the letter M, or W. This is where we begin our planning of the jump position…
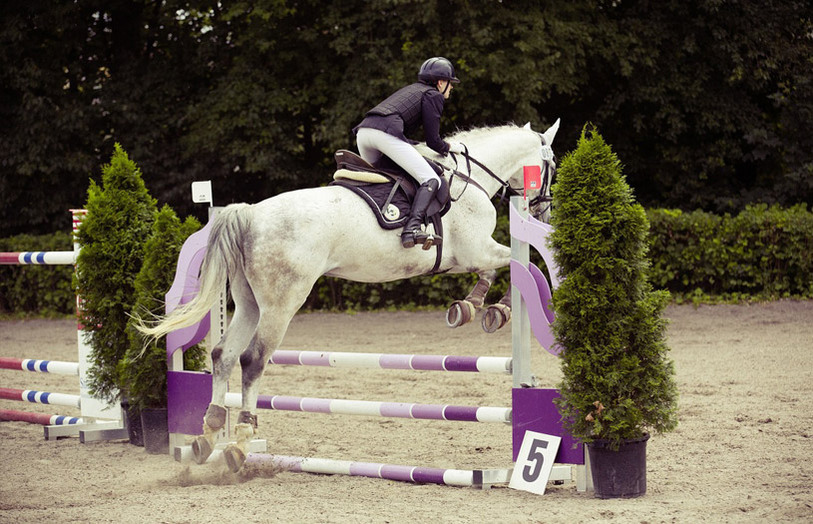
Here, we have a rider showing a pretty solid jumping position.

Her lower leg is a fraction further back than ideal but it’s pretty close. Look at the yellow line – do you see how it forms 3 parts of the letter M? The foot is one upright side, the thigh and shin are both at 45° angle, forming the 2 central, diagonal lines, and if she was demonstrating a bigger jump, so flatter position, her back would be the 4th line, parallel to her foot. The orange line shows something that we should always be looking for, whether in dressage or jumping position, the hip and heel to be in alignment. See how her heel is a bit further back than the hip?
 This is a dressage saddle, but it shows us what is important in all positions. When a balanced saddle is designed, the saddler sets out to form two straight lines. The pink lines show that the stirrup iron should hang directly below the stirrup bar. The saddler has set the bar in that position so that the stirrup iron isn’t dragged forward or backward. He then decided on the approximate height of the rider (based on the inch size of the saddle). He knows that a 17.5 inch saddle is going to contain a fairly tall adult. Thinking of the size of the rider’s foot, he can work out where their heel would be, and places their hip, or seat bones, directly above the heel – which is the green line. Those two lines, green and pink, create the basis of our position. The yellow line then shows how the rider would sit – the thigh and shin making the front triangle, the upright part being the hip to heel line.
 This rider (on the right), again in a dressage saddle, shows those lines in action. Stirrup bar above stirrup iron, hip above heel.
 Same rider, same saddle (on the left). See what happens when he pushes the stirrup iron forward? The stirrup bar is now behind the stirrup iron. His hip is now behind his heel. He’s gone from a balanced place, into a chair seat.
Look back to the jump rider above… She has slightly done the opposite, her heel is a fraction behind the hip, because the stirrup iron is a fraction behind the stirrup bar. If we pushed her a heel forward a little, she’d be in a perfect spot.
Here we see the same jumping rider, showing us a very common problem. Where has the M gone?

Any of these factors could be the primary issue - the rider’s lower leg swings back, pulling the stirrup with it; the shoulders drop too far forward and the rider pinches too tightly with the knee; the knee pinches in too tightly, which swings the lower leg back. We want the knee and thigh to be in contact, but if the lower leg moves too far back, the knee is likely to over tighten. Why the yellow line? Because, in this position, the rider is liable to drop too far forward with her upper body, so encouraging the horse to fall on his forehand and/or knock fences in front. We cannot possibly have the M, because the thigh and shin cannot match each other in their 45° angles.
So, what’s with the red line, behind the rider? Notice in this photo, the line is long, while in the first photo I am pulling her back with an elastic band around her hips, and making that line shorter? A lot of riders launch themselves up their horse’s neck, going too high out of the saddle and so ending up in front of the horse. By holding the rider’s pelvis further back, we encourage the rider to stay in their hip/heel line, so keeping them in better balance.
 This picture on the left is me, many, many years ago, riding my first junior horse. He could jump like a stag but could also throw in some very dirty stops. And the problem with a horse like that? The rider becomes defensive – waiting for that refusal.
Do you see how far forward my leg has gone? And that has thrown my weight backwards into a chair seat, meaning that I’m sitting too down and heavy on his back. In fairness, he still seems to be doing a pretty good job of jumping the fence but I'm certainly not helping him!
This would be similar to the dressage saddle rider, who has their leg too far out in front of them.
 Here (on the right), we have one of my pupils, doing a fairly good job with her upper body, and nice following hands. If her stirrups were a hole or two shorter, we’d see a better angle through her knee and heel, allowing her knee to be in a more forward position, with her heel slightly further back. Her back and thigh form the top two lines of the M, shin and foot, not quite so well.
And again (in the image below), another pupil, another example of the lower leg just swinging slightly too far back. It really is one of the most common rider faults. She is very close to it though, with lovely forward hands.

The exercise that I do with riders before we even begin to consider jumping, is getting them off their horse, and standing on top of a jump pole.
 Stand on the ground, on your own two feet. You are perfectly (hopefully) balanced, between leaning too far forwards and leaning too far backwards. If we drew a line, through your ear, shoulder, hip, and heel from the side, it should be straight, 90° to the ground. 50% of your weight is in front of you, 50% of your weight is behind you.
Fold into your jump position. You should be able to maintain this weight distribution. Now, straighten your knees, still folding from your hip – chances are, you’ll start falling backwards, because your hip is now pushing more weight behind you. Over bending your knees, will now pull too much weight in front of you.
So, if you begin to wobble backwards, you need to correct this by sending your knees forwards, over the front of your toes. If you wobble forwards, you need to take more weight into the back of your thighs.
The rider above is showing good balance standing on the pole, in a fairly upright, more dressage type position.
Watch this video…
This rider is doing an awesome job of keeping her balance as she shifts from dressage position to jumping position and back up again, which is what we have to do when we are jumping a line or course of fences. We have to be able to remain balanced, so as to not interfere with our horse’s balance, making him lose focus or drop a leg on the fence. If her balance begins to wobble backwards, she has to send her knees further forwards, over her toes. If her balance wobbles forwards, she needs to get her hip back (as we did with the jump rider in the first photograph, holding her back with an elastic band around her hips).
And the balloon? Blowing up a balloon increases the use of your core. Take a balloon, and try to blow it up, only using the puff of air in your mouth. Nothing happens, right? Now, blow up the balloon. Feel how much core strength it takes? Rest your hand on your belly as you are blowing up the balloon and feel how your belly muscles (they are there!) push against your hand. Perfect. Try the pole exercise without the balloon, then try it again with the balloon and see for yourself just how much easier it is… Please DON’T start trying to blow up a balloon while riding your horse! But, having the muscle memory and thought of that feeling, can make a huge difference to finding your balance when you are back on!